Tutorial

New Tutorials

Over the past few weeks I have responded to the requests from readers of my book, Cute Crocheted Animals. Some people have messaged me and asked if I could post some video tutorials to help with their making. If you pop over to my tutorial page you can find links to all my video tutorials posted on Youtube.

There are two new guides for you there:

Creating Character on the Animal Faces

Joining Legs on Cute Crochet Animals

I will be honest with you and have no real desire to be on video, but it is nice to be able to show you specific techniques for this book in real time. If you find these videos helpful please do drop a comment below.


New Tutorials Read More »

Yarn Shop Day 2017

Hello Lovelies, I cannot believe that Yarn Shop Day has come around so quickly again. On Saturday 6th May I will be making my way over to Black Sheep Wools in Warrington to spend the day with my lovely friends at the Yarn Barn. In 2015 I was part of Yarn Shop Day with Black Sheep Wools and they won the British Knitting Awards for best event, that was how good it was. There is nothing more wonderful than supporting you local bricks and mortar yarn shop and this glorious day is supported by Let’s Knit and Let’s Get Crafting magazines

This year I will be showing you the gorgeous crocheted characters for Debbie Bliss and you can chat to me about my latest – Cute Crocheted Animals: 10 Well-Dressed Friends to Make
Come and take a peek at my designs and get some 1-2-1 advice on your crochet technique.  If you have already made one of my animal designs I would love to see them.

Workshops

I have two drop-in workshops planned

Amigurumi Crochet How to | 10am – 11.30am | 1.30pm – 3pm

I will be sharing my top tips on how to create cute features for the faces of your adorable animals. A slight slip of the stitch here or another stitch there can really change the face from being happy to angry. I will also be demonstrating working in the round and how to attach limbs.

Sarah Hatton will also be at the yarn barn. I love Sarah. He designs are so fresh and modern. She is truly a British Knitting celebrity and I always love to hook up with her when we are at the same knitting shows. You will recognise her name from being featured in many Rowan publications over the years and in her own books, most recently Modern Mini Knits. Garments from this book will be on display for you to discover Sarah’s designs. Sarah also teaches workshops too, having taught many here at the Craft Barn in Warrington.

Knitting Tips & Tricks | 10.30am – 11.30am | 1pm – 2pm
Sarah will be holding drop-in sessions where she will be showing knitting tips and tricks that will improve the overall finish of your knits, sharing her most favoured methods of sewing up and finishing. She will be happy to answer your knitting questions and help to advise on your next project too.

Knitting SOS with Sarah Hatton | 2pm – 3pm
Bring in your latest project for a quick once over. Sarah will be on hand to help with any knitting mishaps that you might have encountered recently.

emma-varnam-penguin-debbie-bliss

Added Bonus

Being a Stylecraft Blogstar I know that I will also have some goodies available from my friends at Stylecraft and you must also plan to take time to eat some fabulous cake when you are there.

Please do pop across to say hello and have a little yarn knatter.

Save

Yarn Shop Day 2017 Read More »

Notes to a Novice Knotter – it’s all in the detail

crochet-meme-emma-varnamRight side, wrong side

I was looking at a well known crochet book the other day and I noticed that a very pretty blanket had been photographed with the wrong side showing. I thought to myself, ‘I bet the designer was really frustrated with that image’. Then it occurred to me that in many ways this was a compliment to the person who made the blanket, the right side and the wrong side were obviously difficult to tell apart.

Now I admit that you need to be a fairly seasoned crocheter to know the wrong side from the right side. The benefit of crochet is that usually the pattern is inter-changeable. This is only possible if you get all your ends neatly tucked away and you take as much care with the neatness of all aspects of your work.

Final touches

The very best craftspeople take proper care of the final touches. I once saw the Queen’s coronation dress displayed in Kensington Palace. What struck me was the detail of the embroidery. Such perfection. The very best haute courture dresses cost so very much because every detail, every stitch is finished by a seamstress of great mastery.

I am not wanting to burst your fun bubble with crochet or knitting. I know that loads of you just want to create and make…’Finishing – Pah!’, you cry, ‘What’s next on the hook baby?’

But after a while the WIP’s (works in progress) pile up and you will need to spend some serious time with the tapestry needle and a pair of scissors to ensure that pile of mid-made monstrosities make their way heavenly heirlooms.

wrongside1

Good things take time

My advice, for what is worth is to learn to love this last part of the making process. See it as the icing on the cake. I wrote about the ‘Blocking’ process a couple of weeks ago and it would be worth having a small look at this. But before you block it is always best to weave in your ends.

The equipment

I always have a pair of very sharp, small, pointed scissors to hand. These will give you accuracy when you cut. I have a range of tapestry needles, different size eyes for different thickness wool. But if I am honest I do like a sharp point so I can weave in the yarn through the fibres.

wrongside2

Backwards and forwards

When you crochet it is possible to capture the last end you have cut in your next row. But weaving in as you stitch will never fully make your ends secure. I speak to you now from bitter experince. I have many unraveled projects. Crochet motifs that have begun to look a little worse for wear.

My recent conclusion based on some research and practice is to ensure it end is woven backwards and forwards three times. This will ensure the end will not budge. What it does mean is that if you have already captured your work once in the following crochet row, you can just weave in a following two times.

Handy Hints

When I add in a new yarn colour I have begun with placing the new yarn with a slip knot on my hook and then begin my first stitch. This seems to work for me and I have had fewer unraveling incidents.

I do take time to check how each side looks when I have finished weaving in the ends. I make sure that my yarn has not popped out and made an unwelcome appearance on the right side.

If you are wanting to be geeky – I love an in depth book or manual, then the book Finishing School (Master Class for Knitters) has some excellent tips which work both for knitting and crochet.

If you have a granny square that has begun to unravel then I would also suggest look at a fabulous article Granny Square Repair by Claire Montgomerie. She guides you through how to repair the centre of an unraveling motif, my worst crochet nightmare.

Once you have finished all the weaving in, then blocking will help bind the fibres together.

Look I have no desire to sound like a nagging crochet aunty. But really this blog is about providing you with encouragement to take a little time, have a little patience. Dance like there is no instagram – create as if it will last forever.

wrongside3

The images I have used in this post have been taken from the  ‘wrong side’. If you have any finishing top-tips you would be willing to share, then please leave a comment below. I would love to learn from you.


Save

Save

Save

Save

Notes to a Novice Knotter – it’s all in the detail Read More »

Blocking – why and how to block

blockingboard1

I got very excited on Friday. My new Blocking Board arrived. A new bit of crochet technical kit. I have spied this board on the internet and have desired to have my own for a while.

‘Blocking, what on earth and why?’,  I hear you cry. Well if I am ever at a workshop, trade fair or interviewed by a magazine, and they say; ‘What is your top tip?’. My answer is always; Blocking.

Beginners and seasoned crocheters alike avoid blocking their work and it is easy to see why.  If you have just finished a garment or a beautiful blanket you are impatient to show off your finished piece and then start your next project.

But once you have invested in yarn and spent so many dedicated hours finishing your project, there is nothing more crushing than a blanket that looks more at home in a dog basket than displayed proudly on your sofa. Blocking make an enormous difference to your finished projects, and many crocheters will testify to the fact that once you start you never go back to your old impatient ways. .

Blocking

During the making process the fibres of the yarn can often become crumpled and creased. By blocking your work, the fibres can relax, the stitches become regular and your can set your finished piece to the measurements you require.

There a number of techniques which can be used and dependent on the project you can choose different options. Obviously toys, amigurumi, bags and coasters do not need to be blocked. Items like lace shawls, scarves and blankets should be ‘hard’ blocked. Garments can either be wet blocked or steam blocked. In all cases the items need to be wet enough to so that the fibres relax and you can re-shape them into their final position.

blocking board - emma-varnamBlocking – what do I use?

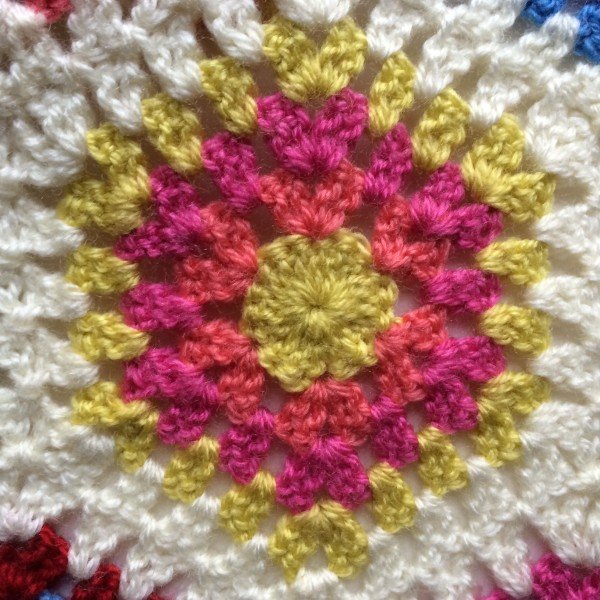
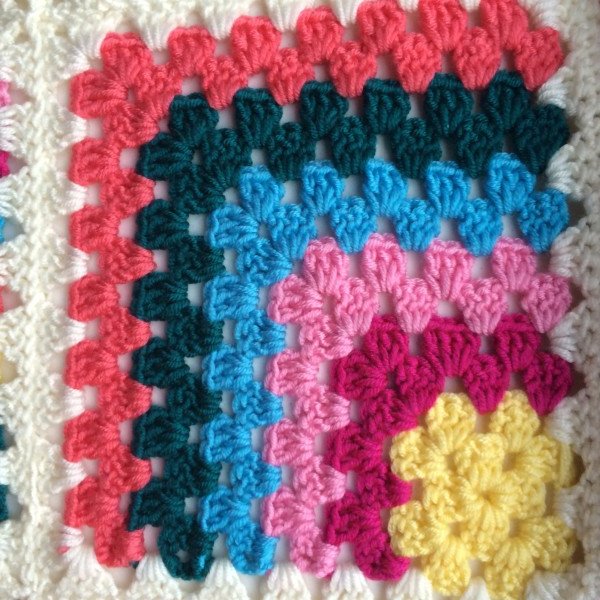
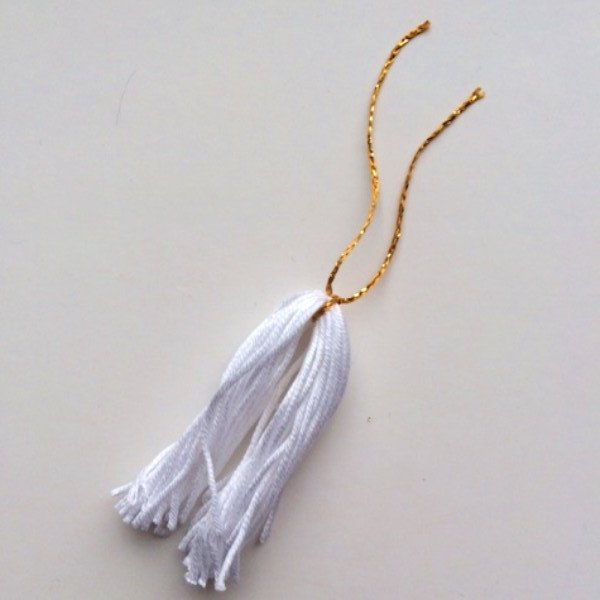
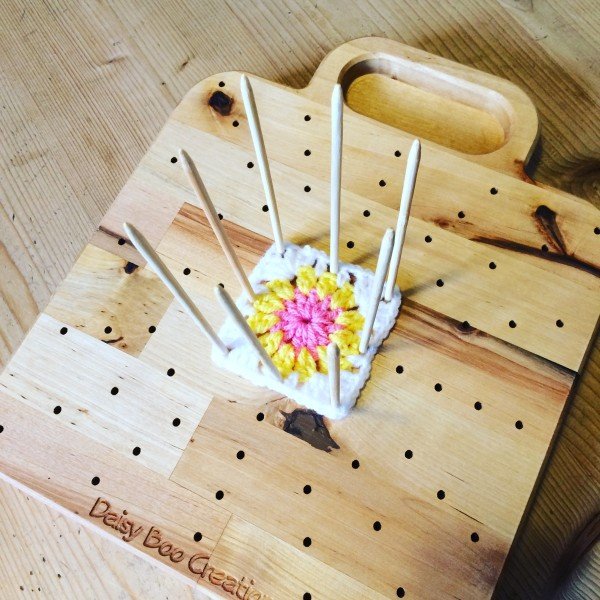
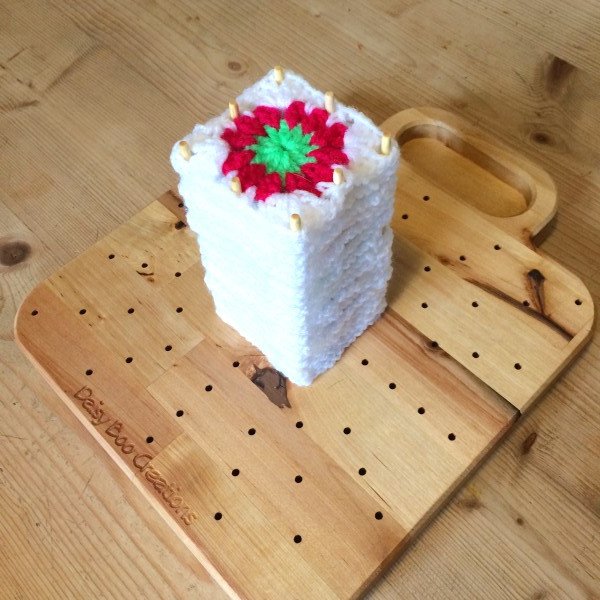
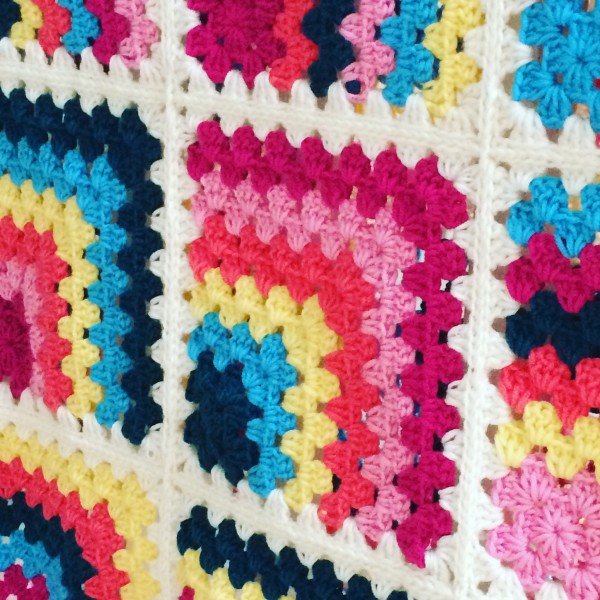
Well I have just bought this lovely new board from Daisy Boo Creations. I make quite a few Granny Squares and this board will enable me to stack a number of squares in exactly the same shape on these wooden dowels.

Firstly do check the ball band to ensure that you can get the yarn wet. I then dampen the square using a waterspray, which you can buy from most supermarkets. I will then pin out the square to the size and shape you need.

Now bear in mind I have been crocheting for many years and make very many projects. You don’t need to invest in blocking boards;. Small projects can be easily blocked on an ironing board. Another really practical idea is using kid’s foam play mats, these link together and can form a really large blocking area for big blankets or garments. I will continue to use my Prym Tensioning and Steamer Mat
which I notice even John Lewis are stocking now. This has a printed grid line system which is really helpful for garment blocking and granny squares.

blocking-granny-squares-crochetHow to block

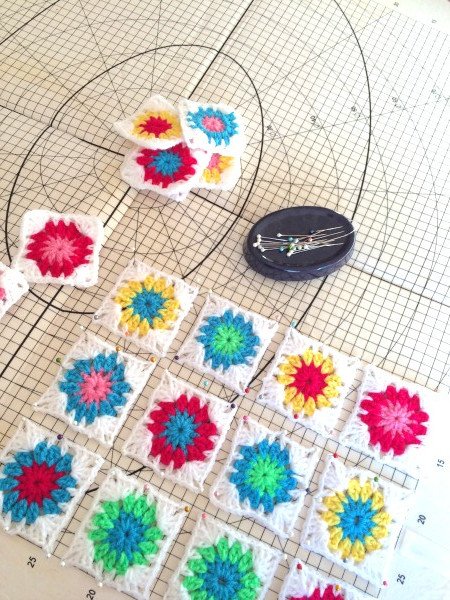
Take your project and lay it on you blocking surface. Start at one corner and pin gradually along the edges, gently pulling the crochet into place and securing with a pin. As you work around the edge of the piece, you might notice that you have pulled one area more taut than another, simply remove the pins and reshape. Once you are happy with the overall dimensions, spray it all over with tepid water. Leave to dry.

Wet blocking

Many designers wet block their garments as the process fully sets the seams together and it is the process which will be used every time the garment is washed. Soak the item in a little lukewarm water, you can add a little no-rinse wool wash and leave for around 20 minutes. Then drain your sink and very gently squeeze out the water, but do not wring the garment. Ensure that you scoop your item out of the sink and do not hang it out as this will stretch the fibres. Lay the garment between two towels and gently roll the towels up to remove as much of the excess water as possible. You can then lay your item out on your blocking surface and gently pin it out into the measurements you require.

mietred blanket-colourful- Emma- VarnamSteam blocking

This is a slightly faster version of the process above, and is good for removing persistent creases from garments. Lay your crochet out on the blocking surface and use a steam iron or garment steamer to allow the hot steam to permeate the fibres. Make sure you don’t let the iron touch the crochet, because it will easily flatten textured stitches and totally ruin any acrylic yarn, making the crochet limp and lifeless.

In all cases of blocking, make sure the crochet is totally dry, ideally leave your work for 2 or three days if you can.

Essentially this is my top tip for all crocheters. It will make an enormous difference to your finished work. I promise you – you will thank me later.

Save

Save

Save

Save

Blocking – why and how to block Read More »

Learning new tricks and facing the steeking

steeking-juliet-bernard-workshop-knitting

I find that if you ever feel stuck in a rut, then the best thing to do is to learn something new. Better still, do something you have previously feared. In my case it would be ‘steeking’. Steeking is a technique which allows you to cut your knitting.  You knit in the round, by that I mean a continuous circle. As part of the pattern you create special section which you will later cut to reveal a flat piece of knitting.

If you can imagine, it is like knitting a tube and then cutting the front opening to create a buttonhole band for a cardigan. All very risky and it would be easy to think that your knitted stitches would ravel away. I don’t do a lot of knitting now, but have always wanted to crack steeking. Face the fear and do it anyway.

steeking-juliet-bernard-workshop-knitting

Juliet Bernard

This Saturday I had the utter treat of joining other knitters at Black Sheep Wools for a Steeking Workshop with Juliet Bernard. Juliet is a very accomplished knitter and designer and for many years was the Editor of the much admired Knitter Magazine. With me were a group of fabulous knitters. These were ladies with skills; Lucia, Lesley, Nancy, Pat and Helen. I was in auspicious company.

steeking-juliet-bernard-workshop-knittingsteeking-juliet-bernard-workshop-knittingsteeking-juliet-bernard-workshop-knitting

Juliet is a wonderful tutor, really patient and encouraging. Firstly we started knitting in the round using the fairisle technique. Now for a while I have wanted to learn how to knit fairisle continental style. Some of us used double pointed needles. Lucia and I persisted with the continental style. Lesley and Helen showed me their technique of using the ‘Magic Loop’.

steeking-juliet-bernard-workshop-knittingWhat is wonderful about a workshop like this, you not only learn from the tutor but in discussion you pick of tips from your fellow classmates. Throughout the day we had lovely coffee and tea available. A sumptuous lunch appeared half way through the course, topped off with some stunning cakes.

steeking-juliet-bernard-workshop-knittingTop Tips

During the workshop we knitted a tube of fairisle, using Rowan’s Felted Tweed. We were creating a fairisle mug cosy. We used a schematic graph to follow the pattern and Juliet generously lent us some of her highlighter tape to keep track of where we were. I have got to order some of that tape!


After lunch Juliet showed us how we could crochet two over-locking lines down the length of the cosy. We then took the scissors to our knitting. Frightening stuff. I must admit that cutting through the fabric was quite exhilarating and there were several rounds of applause.


We all managed to finish our cosies, picking up and knitting a picot edge binding. The wonderful Helen demonstrated how she attached and cast off her binding at the same time.

steeking-juliet-bernard-workshop-knittingOne of the joys of the day was just chatting, laughing and sharing tips and patterns with my fellow pupils. I came home with more yarn, due to the suggetions of super-chic Pat. I am now knitting an Arabian Nights shawl in beautiful yellow toned sock yarn from West Yorkshire Spinners.

Knitting and Stitching Show 2016

Don’t feel you have missed out. This week Juliet will be teaching ‘Steeking’ at the Knitting and Stitching Show in the Creative Living Theatre.

Thursday 6th Oct – 15.00-15.30

Friday 7th Oct – 14.15-14.45

Saturday 8th Oct – 13.30-14.00

Those of you are going the Knitting and Stitching Show on Friday 7th Oct – will you come and see me on the GMC stand between 14.00-16.00? It would be lovely to see you.

If you live in the North West of England and fancy a little bit of learning then I would suggest looking at the Black Sheep yarns workshop page and booking on Juliet’s course on cabling on Friday 28th October – I had the most wonderful time and met some lovely people.

Save

Save

Save

Learning new tricks and facing the steeking Read More »

New Video Tutorial – Join as you go Granny Square

I have to tell you that it is great fun to see the video tutorials I recorded for Crochet Now Magazine up on You Tube. One of my favourite blanket making techniques is ‘Joining as you go’. By adding your Granny Squares or Hexagons as you make them – the blankets grow quickly and the making seems less daunting. Pop over to the You Tube channel if you fancy getting a technique update.

New Video Tutorial – Join as you go Granny Square Read More »

Weekend Project – Pom Pom Bag Charm

pomptutorial1pompomcharm1

I have a cute little weekend crafting project for you which is very much on-trend; he pom-pom bag charm has an additional bonus of being lots of fun to make.  Pom-poms and tassels are adorning lots of summer bags and baskets in the shops.

Here are some very cute examples from Boden, Accessorize and Anthropologie. Inspired by the look I decided to create a bag-charm for my new beach bag. It is so easy to do.

pompomcharm2

Firstly the materials

A keyring fob or clasp – (you do not need this and can simply tie your charm to the handles of your bag)

3 different colours of wool – (I used aran weight for extra fluffiness)

2 different cotton weight yarns

1 lurex yarn

A pom-pom maker

3.5mm crochet hook

A small piece of card (mine was 8 x 7cm)

Some sharp scissors and a tapestry needle

pompomcharm3

Firstly I made a cord on which to sew my pom-poms and tassels. I took some blue yarn and combined it with some lurex yarn for extra bling. I made 28 chain stitches, then I double crocheted into the 2nd ch and every chain to the end. I left a long tail of yarn at the end. Using this tail I sewed the end of the cord to the keyring/lanyard fob and made sure I secured it.

Then I made 3 pom-poms. I used a pom-pom maker and I have a blog post about that here. But you can also make pom-poms using a fork so don’t think you need any special equipment at home. The yarn I used to tie up my pom-pom was the same as the yarn I chose to create my charm cord. I then sewed each pom pom to the cord quite near the end.

pompomcharm9

I then made two tassels. I find it looked better using a cotton yarn for this. The tassels don’t fluff up so much and look sleek.

pompomcharm8

I cut a small amount of lurex which I would use to tie the top of the tassel and placed it along the top of the card. I then used the cotton and wrapped the yarn over the card, ensuring the lurex was captured. I wrapped the cotton around about 30 times.

pompomcharm7

I then knotted the lurex yarn on the top of the tassel. Using sharp scissors I cut the bottom of the tassel which is at an opposite end to the lurex.

pompomcharm6

pompomcharm5

I then cut a small length of lurex and made a slip-knot in one end. I placed the loop of the slip-knot over the top of the tassel and pulled the slip-knot tight. Using the long end I wrapped the lurex round the yarn tassel several times and pulled it tight. I used a tapestry needle to make some small stitches in this lurex wrap to secure the yarn.


On both the pom-poms and the tassels I used my scissors to neaten up the edges and get rid of any stray strands.

Finally I wrapped the end of the cord around one bag handle and secured with the keyring/lanyard fob.

We are good to go and strut our stuff on the beach or the high street! Happy Weekend.

If you have a go at this project and have fun – please do send me some photos I would love to see them.

Weekend Project – Pom Pom Bag Charm Read More »

‘I am ready for my crochet close up dahling!’

crochetnowmag2

Weeks and weeks ago I spent a happy Saturday filming how to crochet for a new magazine Crochet Now. The lovely editor, Hugh Metcalf and I spent hours filming and photographing my hands as they worked through a series of techniques and stitches.

crochetnowmag3

Lots of my friends have asked me to teach them to crochet. Indeed I have been quite successful in imparting the magic hook wielding techniques. Now, however there is no need to listen to my voice, because Crochet Now Magazine have a lovely set of videos which will take you through the basics with my fingers doing the work.

crochetnowmag1

I can’t tell you how hard it was to slow my fingers down for each stitch. There was much giggling as I would have to re-do stitch after stitch. You can see in one of these photos that quite a lot of black coffee was drunk as well.

I never saw myself as a hand model and have always rather disliked my little fingers, but I am confident in knowing how to handle the hook and it is rather nice to see my fingers working away on film. As I write there are two videos available and more will be released in the future.

crochetnowmag4

Have a look at the videos: Chain Stitch here and Double Crochet here

Do pop by the website of Crochet Now Magazine.

Tell me what you think and it you enjoy them.

‘I am ready for my crochet close up dahling!’ Read More »

Love Crochet – Love Fruitilicious potholders

fruitypotholders1

This summer I have really been inspired by outdoor living. It is easy to make the odd cheeky accessory to brighten up the kitchen or the patio table and bring a little bit of zing into your life. The lovely people at Love Crochet asked me if I would design a summer project which was very much ‘on trend’. I try where-ever possible to I like to design things that I am keen to use myself.

fruitypotholdersI knew immediately what I would make – Fruity Potholders…obviously. In the shops and the magazines watermelon and tropical fruits are a key theme. Let’s follow suit with our oven-to-table accessories.

fruitypotholders3This design is so easy. A basic crochet in the round with slip-stitch embellishment and the odd bit of embroidery. There is a photo-tutorial of the process on the Love Crochet blog.

fruitypotholders2

If you also fancy reading the interview I did with the Love Crochet team you can read it here.


Love Crochet – Love Fruitilicious potholders Read More »